Deploying a Kubernetes Sensor
This guide will walk through the steps to install and configure a Kubernetes sensor deployment to collect events from Kubernetes clusters and publish them to the client tenant running in cloud.
Pre-Requisites
Follow the guide for Common Pre-requisites to complete the pre-requisites for deploying a sensor.
Kubernetes Cluster Access
The Kubernetes sensor requires "read-only/view" access to the Kubernetes API server. The access can be provided using a Service Account (SA) with the appropriate role. The following steps can be used to create a SA and a role binding to provide the required access:
-
Use the service account that was used to deploy the Pulse Sensor Controller inthe cluster and grant this a cluster-view role to the service account. If thePulse Sensor Controller was deployed using the default service account(orcasio-sa), the following command can be used to create the role binding:
-
Get the token for the service account
-
Generate a "kubeconfig" context from the token if needed. Depending on the option of the sensor deployment, the "kubeconfig context"/ServiceAccount can be used to configure the sensor to pull events from the local cluster or from remote clusters.
Note
The above steps are provided as a sample and can be modified to suit the organization's security policies.
Note
The sensor requires "read-only/view" access to the Kubernetes API server. If cluster-wide access is not allowed, the sensor can be configured to pull events from a specific namespace by creating a role and role binding for the service account.
How it works
The sensor listens to the cluster that it has the configuration to connect to and pulls events from the Kubernetes API server. The events are then published to the Pulse Platform tenant using a HTTP stream publish as signals.
Configuration
Deploy the Kubernetes Sensor
The Orcasio Pulse Kubernetes sensor can be deployed in any Kubernetes cluster (Docker Desktop / Kind / Minikube/ etc - Version 1.23.x and above) either on a Cloud Provider or a Developer machine. The sensor configurations allow the sensor to pull events from the local cluster or from one or more remote clusters as long as network connectivity can be established between them.
Here's the options to deploy the sensor:
Deploy the sensor local to each cluster and configure the sensor to pull events from the local cluster and publish to the client tenant. This option is preferred as it does not require any external authentication keys (via kubeconfig) to be provided to the sensor. The following diagram represents this option:
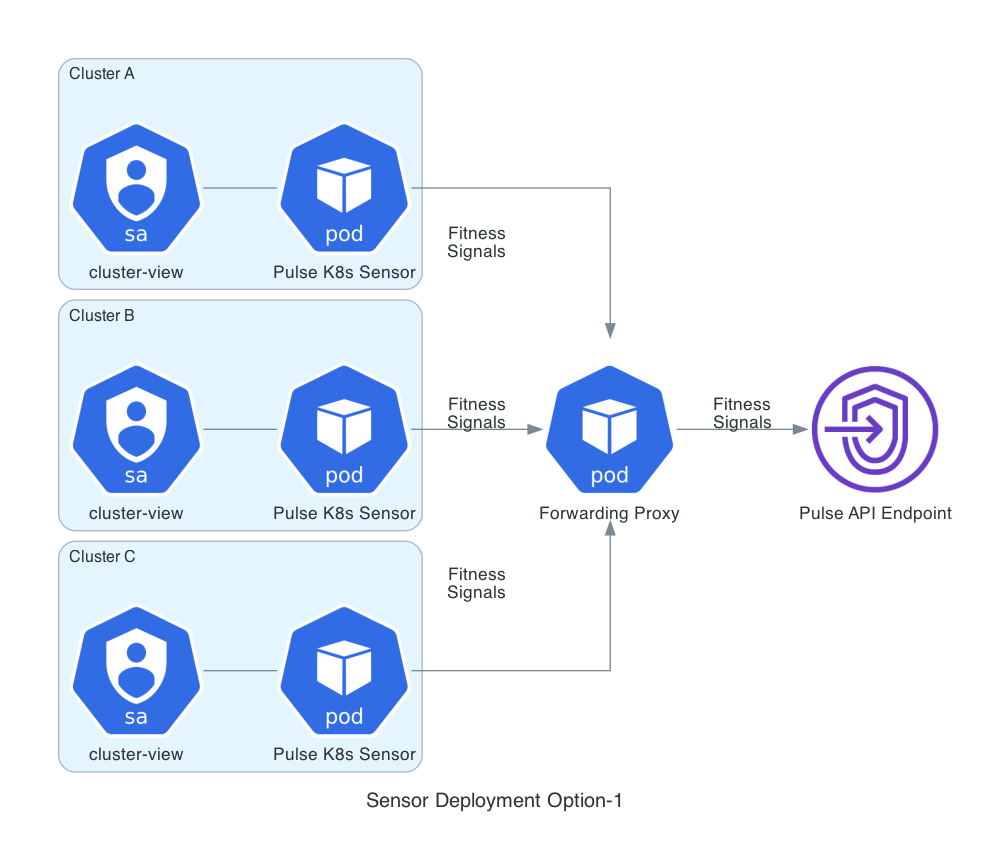
The "Forwarding Proxy" pod is optional and can be deployed to simplify firewall egress rules for the organization. The forwarding proxy can be deployed in a common kubernetes cluster that has access to the internet and the sensor can be configured to use the proxy to publish events to the client tenant.
Deploy the sensor on a cluster that has access to all the remote clusters and configure the sensor to pull events from the remote clusters and publish to the client tenant. This option requires the a kubeconfig created as a secret and mounted to sensor pod with "context" entries to all clusters that it can connect to. The following diagram represents this option:

The "Forwarding Proxy" pod is optional and can be deployed to simplify firewall egress rules for the organization.